|
|
Bachelor's Degree in Telecommunications Systems and in Network Engineering |
|
Microchip Explorer 8 board |
(1) Intro-lab (2) Interrupt (3) Counter_BCD_1digit
| Prototype specifications | Planning | Development and Test & Measurements |
Board Explorer 8, target microcontroller: PIC18F46K22, tools: MPLAB X + XC8 + MCC + Proteus + MPLAB SNAP in-circuit debugger - programmer.
Project: Intro_lab. To take full advantage of this board the programming environment requires MCC (MPLAB Code Configurator) application embedded in MPLAB X. The chip must also be upgraded for instance to PIC18F46K22, which is also available in Proteus.
This is an introductory project Intro_lab.pdsprj to guide you on the use of MCC to specify hardware and peripherals. The application program Intro_lab.X.zip is organised in multiple c files. Unzip and copy the full directory at location:
C:\DEE\LAB2\Intro_lab\(files)
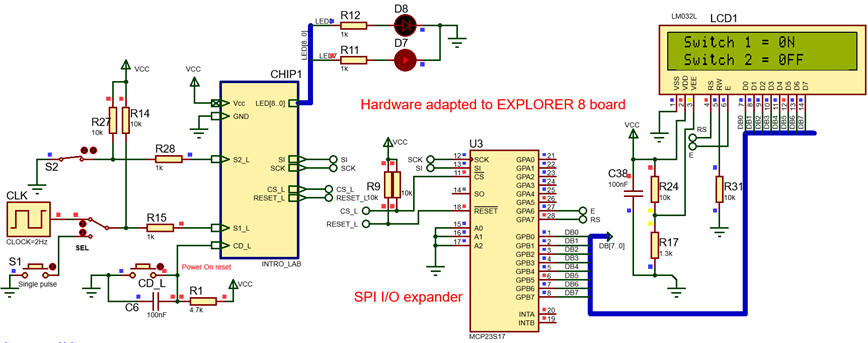 |
Fig. 16. This application can be used as a seed project to copy and adapt, no need to start from scratch. The full tutorial application that exemplifies several features of the hardware available in Explorer 8 board from Microchip. |
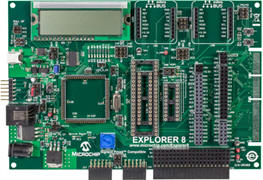 |
Fig. 15. Explorer 8 board to be used with the PIC18F46K22 chip. Expansion connectors can be used to connect buttons and LED. |
| Prototype specifications | Planning | Development and Test & Measurements |
A. Hardware
To complete
B. Software
| Prototype specifications | Planning | Development and Test & Measurements |
Developing will be integrated with testing for each of the planned steps. We can only go ahead when the current steps works correctly.
A. Hardware
B. Software
(1) Intro-lab (2) Interrupt (3) Counter_BCD_1digit
| Prototype specifications | Planning | Development and Test & Measurements |
Board Explorer 8, target microcontroller: PIC18F46K22, tools: MPLAB X + XC8 + MCC + Proteus + MPLAB SNAP in-circuit debugger - programmer.
Project: Interrupt. To take full advantage of this board the programming environment requires MCC (MPLAB Code Configurator) application embedded in MPLAB X. The chip must also be upgraded for instance to PIC18F46K22, which is also available in Proteus.
This is an introductory project Interrupt.pdsprj to guide you on the use of MCC to specify hardware and peripherals. The push-button S1 generates INT0 interrupts to update Var_SW_S1. The application program Interrupt.zip is organised in multiple c files. Unzip and copy the full directory at location:
C:\DEE\LAB2\Interrupt\(files)
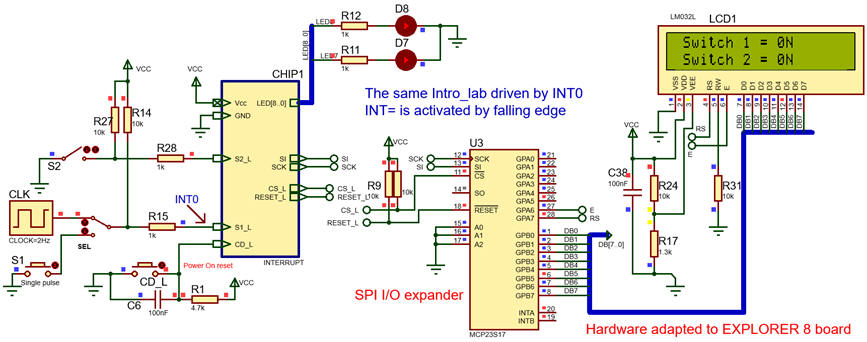 |
Fig. 16. This application can be used as a seed project to copy and adapt, no need to start from scratch. The full tutorial application that exemplifies several features of the hardware in Explorer 8 is available from Microchip product page. |
| Prototype specifications | Planning | Development and Test & Measurements |
A. Hardware
B. Software
| Prototype specifications | Planning | Development and Test & Measurements |
Developing will be integrated with testing for each of the planned steps. We can only go ahead when the current steps works correctly.
A. Hardware
B. Software
(1) Intro-lab (2) Interrupt (3) Counter_BCD_1digit
| Prototype specifications | Planning | Development and Test & Measurements |
Board Explorer 8, target microcontroller: PIC18F46K22, tools: MPLAB X + XC8 + MCC + Proteus + MPLAB SNAP in-circuit debugger - programmer. In this case, multiple files are specified by the MPLAB Code configurator.
The LCD populating Explorer 8 is wired and operating, but not used until the next design phase #2: counter_BCD_1digit_LCD.
Project location:
C:\DEE\LAB2\Counter_BCD_1digit\(files)
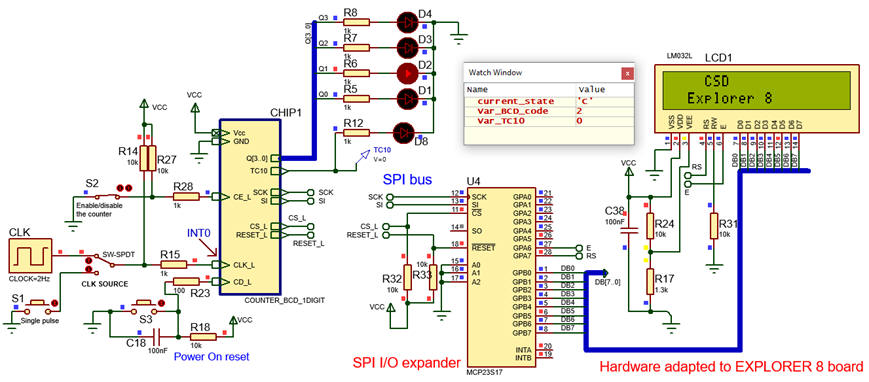 |
| Fig. 1. Proteus captured schematic of some Explorer 8 circuits. As usual, if component models exist, we will try firstly to develop and run the prototype application in Proteus. |
This is the adapted project counter_BCD_1digit.pdsprj and counter_BCD_1digit.zip.
NOTE: To work with this new programing environment, do not start a "new project" but instead "open project" from the unzipped example given saved previously to the destination location.
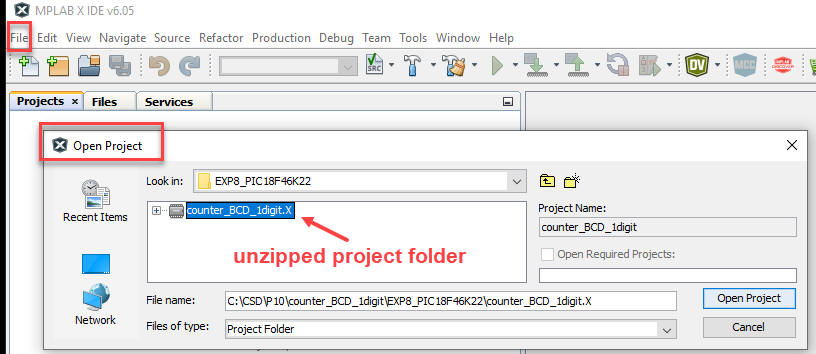 |
| Fig. 2. Open project in MPLAB X. This project, once running can be copied as the stating point for the next design phase #2. |
| Prototype specifications | Planning | Development and Test & Measurements |
A. Hardware
B. Software
| Prototype specifications | Planning | Development and Test & Measurements |
Developing will be integrated with testing for each of the planned steps. We can only go ahead when the current steps works correctly.
A. Hardware
B. Software
| Home Term 26/27-Q1 Contact Products Electronic devices and companies Software Books Magazines Instruments DEE Library EETAC DEEL |

|
|
| Web activa des de 09/2001, @ F. J. Robert, Web editat amb Microsoft Expression Web 4. El contingut és un complement als materials d'estudi del curs Circuits i Sistemes Digitals disponibles al campus digital Atenea. Llicència:Reconeixement 4.0 Internacional de Creative Commons |